Word Art — A Wedding Gift

I’ve been waiting to share this word art with you but because it was a shower gift, I had to wait!!. Our niece M is getting married in June. M and C are wonderful people and I cannot wait to celebrate their nuptials!! I’ve been making word art for all of my nieces and nephews for either their weddings or babies.
M’s twin got married last year and I made this piece for her.

I wanted this one to be different so I did quite a bit of thinking and experimenting. This time I picked up a frame at Goodwill and had DannyO cut a board to fit. M sent me pictures of their wall color so I knew what colors to use. I stripped the frame of its honey brown color and stained it ebony. I had to play around with the positioning of the words for quite a while until I came up with something I was happy with.
Ta-Da!!

Instead of using the last name as a backdrop, I used their last name’s first initial behind the year. I really love this. I think she liked it too!

I always say “this one’s my favorite.” And then I make the next one!!
On to the next adventure.
The Silver Experiment — Part 1 (my journey to silver hair)

April 2017 — Brent and Marissa’s Wedding
I usually don’t write blog posts that are exclusively selfies/pictures of just me, but I’m on a journey and I’d like to document it. Two years ago I decided that, after Brent and Marissa got married, I wanted to see how I looked with my natural hair. I have been dyeing my gray hair for 20 years. I was tired of doing it and it was costing me at least $100 every six weeks and the price was going up. I had used my colorist/stylist since 2012 and absolutely loved her but she refused to let me “go gray.” (I prefer the “go silver” phrase). She said it would age me by 10 years. So… in June 2017, I put a call out to my stylist from 2000-2004. She does a great short cut and I decided that, with my OCD, I couldn’t let it go gray in a long style. I needed to cut it and then go from there.
I couldn’t’ find her so I did what many do these days, I put a call out on social media. A friend of a friend knew where she was and how to get in touch with her!! Yay!!

June 2017
In June 2017, I got 14 inches cut off but had Nikki color it. I sort of chickened out when it came to letting it go gray. She continued to cut it and color it until October. Then I decided to start the journey… baby steps.

December 2017 — with 2 of my sisters, Esther and Heather
Now, Nikki just cuts it. I am in the process of growing it again because I like the ease of longer hair — it is a fallacy that short hair is easier to care for!! So far, so good. I realize that I’ve been coloring it much darker than my natural brown. I am very silver on top but have a medium honey brown underneath, which is what my color was when I was a little girl!!
Nikki recommended that I use shampoo and conditioner specifically made for silver hair. I use MATRIX total results SO SILVER shampoo and MATRIX total results ANTIOXIDANT conditioner (Link to Amazon). I like the results so very much!!

March 2017 — a get together with 3 of my 4 sisters, Debbie, Esther and Susan) — you can see the gray really starting to pop
If I don’t like it, I will color it again. I don’t think it ages me and if it does… {{shrug}} who cares if I look closer to my 58 years. I’ve earned every year!!

You can see the pretty silver on top

Still a bit of brown on the ends


Taken 2 days ago — Me and Jazzy Joy on our walk
I’ll keep you updated!!
Sewing Project – Brumby – Skirt MN2204
I belong to a wonderful Facebook group, Capsule Wardrobe Sew Along. I joined the party late however sewists continue to work on their projects. I’ve also been introduced to new patterns, outside of the Big Four, and have been experimenting with some of them. This is a Megan Nielsen Pattern – Brumby//MN2204
I downloaded this pattern into Letter form and printed it out on my printer and assembled it on the floor of my art studio. It is a tedious process and I will admit that I am inclined to use Big Four patterns because this step isn’t necessary with their patterns. But, since I’m stepping out of my box in 2018, I persisted!
The pattern itself is very straight-forward and easy to sew The only thing I had never done was to sew an exposed zipper. As I’m sewing through my stash, I used some heavier-weight, slightly-stretchy denim I’ve had for years. The zipper I used was ripped from another garment. I couldn’t tell you where I got the zipper!! Although it was very long and I had to shorten it quite a bit, I am pleased with my first effort with an exposed zipper. I obviously didn’t make it as short as pictured, well… because… I’m old 🙂
A few notes… while this profile isn’t the most flattering on me (not to give you a preconceived notion of how I look in it 🙂 ), it is what I wear in the summer quite a bit as it is very comfortable. With MS, heat is an issue so a skirt or dress keeps me cool. I also probably used a heavier weight than I should have because it doesn’t hang as close to the body as I’d like. I also had to interface both sides of the waistband because I chose slightly stretchy denim. That added bulk.
I plan to make it again using a lighter-weight cotton and reduce the gathers so it hangs closer to my body. I really like the pockets! So… This is Version 1!

While I had planned to photograph this skirt outside, we are in the middle of a snowstorm. The white in the windows is blowing snow! I also just painted my toenails so bare feet is whatcha got…


I give the pattern an A+ — easy to sew. The directions were spot-on, including the exposed zipper which, even after 40 years of sewing, was new to me! I will purchase more Megan Neilsen patterns and promise to blog about them.
On to another adventure!!
Nursery Word Art
I needed to wait until T & S received this before I posted because it is a surprise!! I love this family! S calls us Daddy O and Momma O. She’s been friends with our precious daughter for many years. They have one daughter but struggled to have their second child. When I saw Samantha’s picture and her Daddy’s explanation of why they named her Samantha Abigail, I just had to do a piece of art for them.
I knew I wanted to use soft colors. I was actually able to use a frame that Andrew’s Momma (see previous blog) gave me years ago! Yay for recycling! The frame was in perfect shape so I didn’t have to do a thing to it. DannyO cut me a board to fit the frame and I proceeded to mix colors, choose a font (several, actually — I mixed and matched more than I’ve ever done before) and design a corner border. I am very pleased with the result!


It’s soft and I think it’s beautiful!!
On to the next adventure!
Word Art – Two Special Projects
I always consider it a privilege when my family asks me to make them some art.
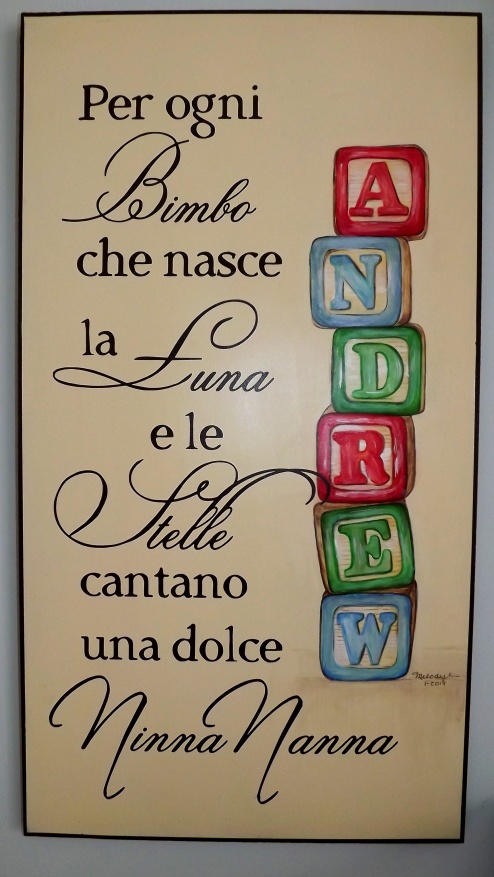
The first piece was for a great-nephew, born in January. His Momma was baptized by Pope John Paul II and is fluent in Italian. She asked me for a piece but didn’t specify the parameters. I thought it would be cool to do the saying in Italian. Hence the difficulty… I don’t speak Italian! I put a few beautiful English sayings into three different translators and got three different translations!! Also, they didn’t look as “pretty” translated into Italian. So I regrouped and sent an email to Andrew’s grandma, asking for help. Between her and her Italian friend, they came up with a beautiful saying — Translated to English, it says, “For every baby born, the moon and the stars sing a sweet lullaby.”
I also wanted to juxtapose the crispness of the text with something painterly. I nearly quit about three times but each time, my painter friends, Paul and Tara, talked me off of the ledge and through my issues. Thank you Paul and Tara!! Here is the finished piece. I am very happy with how it turned out!
The second piece was a little easier in that I didn’t have to paint anything, but I searched and searched for the perfect frame and fonts. My nephew and his wife and boys are going through a particularly difficult time. Their youngest son required a heart transplant at 6 months old. This precious baby is doing well but they have a long and winding road to travel. K asked for this specific saying. Because the frame was large and would have been expensive to purchase new, I made several trips to Goodwill until I spotted the perfect frame in the perfect size! DannyO cut me a board to fit and I proceeded, stripping the frame of its light brown stain and re-staining it a dark brown. I then picked a gray matte paint for the word art and I think it turned out perfect!!
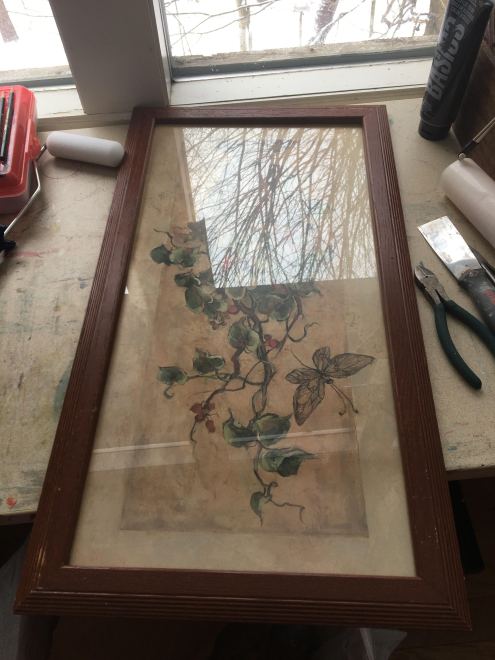
From this ⇑
To this!! ⇓

Two successes!! On to the next “adventure!”
Amish Peach Cream Pie
So, darling DannyO and I ALWAYS exchange cards on Valentine’s Day but we don’t always exchange gifts. This year, it was all I could do to manage a card (have I told you lately that MS, TN and ON suck???). But my sweet hubby gave me one of those Polish teapots and an Amish Cookbook, specifically “Troutville Amish Cookbook, Second Edition.”
I love to read cookbooks!! Many of the recipes in this cookbook were genuinely Amish recipes but some weren’t. The ones that say use “1 can tomato soup” or “cool whip” are NOT Amish recipes.
Anyway, since DannyO gave me such a thoughtful gift and I gave none, I decided to bake him something from the cookbook. I knew that I had peaches in the freezer, which were a gift from my daughter’s MIL from her peach tree. I decided to see if I could find a genuine Amish recipe that used peaches.
The one I found went like this… “Fill unbaked pie shell half-full of fresh sliced peaches. Mix together (then it gave the custard ingredients). Pour over peaches, bake until set.” That’s it!! So I put my 48 years of baking expertise to work, demystified the recipe, and made a great peach pie!! I recreated it yesterday, paying attention to the details so I could blog about it.
Here goes… (Recipe, without pictures, follows the picture tutorial)
Preheat oven to 350. Place aluminum-wrapped cookie sheet on oven rack to heat along with the oven. (Putting the unbaked pie directly on to a pre-heated cookie sheet helps the pie crust bottom not get soggy.)
Make pie crust. I used this pie crust recipe. Make sure not to mix the shortening too thoroughly… you want some pea-sized lumps. You only need 1/2 of it. Shape the rest into a disk, wrap well and freeze.

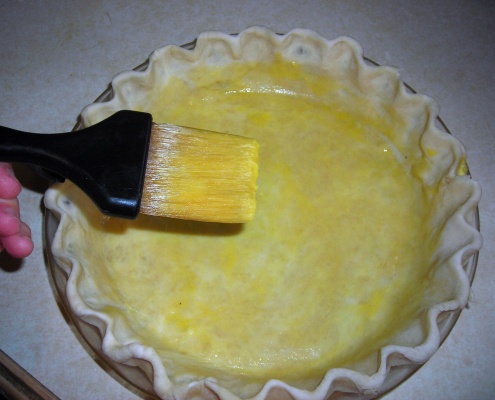
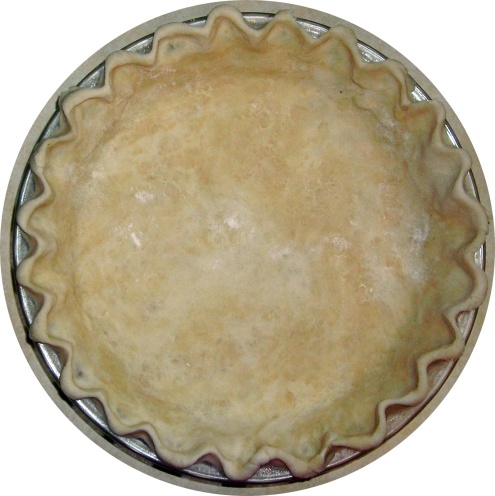
This extra step can be eliminated but I like a firm bottom (haha — I know where you went!!!) — brush the pie crust with beaten egg.

The original recipe called for fresh peaches. I nearly completely thawed the frozen peaches before putting them into the pie pan. For the second recipe, I didn’t have enough frozen peaches so I partially thawed what I had and drained well (I mean for a few hours!!) a small can of sliced peaches and used them. It worked fine!

Make custard filling, making sure to whisk out the cornstarch lumps. (I just used a 4 cup measuring cup).

Pour 1/2 of the custard on the peaches and place in the oven on the cookie sheet. Carefully pour enough custard to nearly fill the pie form, being careful not to over fill. You may have some filling left over.
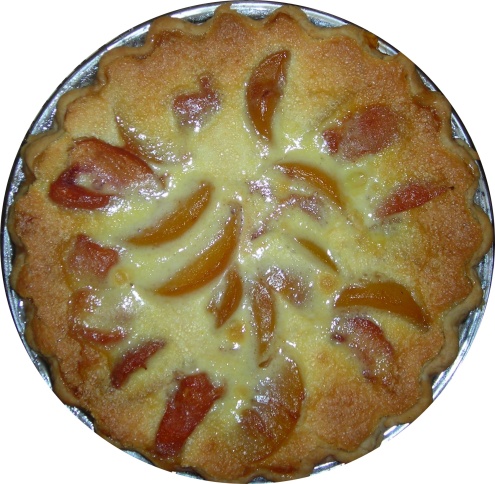
The baking part is the tricky part. I set the timer for 45 minutes, checked it and the edges were starting to brown. But the center was still “wet and jiggly.” So placed a piece of aluminum foil (flat and loose) over the top of the pie. I cooked it for 10 more minutes, jiggled the pan again and it was still a bit watery so I cooked it for 10 more minutes. That was the cooking time for partially thawed/canned peaches — 65 minutes.
So here’s the official recipe…
Peach Cream Pie
- Pie dough for one crust (my recipe is here).
- Peaches to fill 1/2 of the pie pan-either fresh, frozen (partially thawed) or canned (VERY well drained)
- Custard filling
- 1 cup sugar
- 1 cup cream or evaporated milk (I used evaporated milk the first time and cream the second time — both worked perfectly!)
- 1 tablespoon cornstarch (I used tapioca starch the first time and cornstarch the second time — both worked perfectly!)
- 2 beaten eggs
- Preheat oven to 350 degrees. Place aluminum foil-wrapped cookie sheet on to the oven rack as you preheat the oven.
- Arrange peaches in a circular fashion in pie form
- Make custard filling (it’s easy-peasy!)
- Pour 1/2 of the filling into the pie form. Place pie in oven on to cookie sheet. Very carefully pour remaining filling, making sure not to overfill the pie pan. You may have a bit left over.
- Bake for 65 minutes, covering, if needed, after 45 minutes. Pie should be firm in the middle.
- Cool on a cooling rack completely before refrigerating. (cooling in the fridge will make the pie watery)
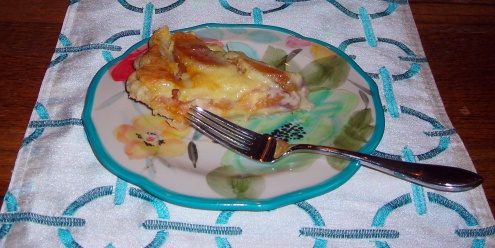
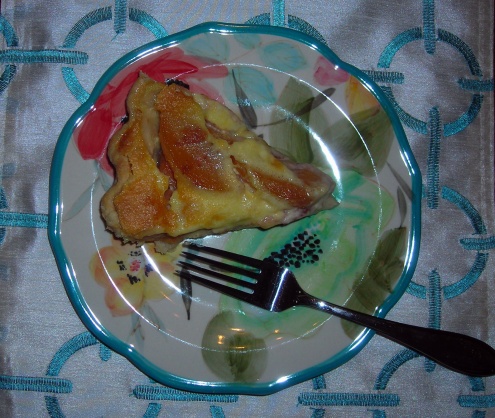
- Cut and enjoy!!
32 Small Things 2018
I know, I know… I haven’t blogged since November 13, 2017. I got busy with the holidays and as I simplify my life, when I add things (even temporarily), I take things away and extend myself grace. Here are a few pictures of the holiday season.


I normally don’t do resolutions. I do have two words that I am using as I move through the beginning of 2018. One is “brave.” The other is “Intentional.” This list is my way of being “intentional” in 2018.
I have a lovely friend, Tab Studer (hi Tab 🙂 ), who writes an inspirational blog. I would recommend reading it, especially those with littles. She did a post, 100 Small Things 2018, I started thinking about writing my own small things post. One problem… she is a very social person with 4 littles, a full-time job, and more energy in her little finger than I have in my whole body. I, on the other hand, live in a kingdom of isolation and I am the queen!!
But, as I’m being intentional, I wrote a list of 32 things. I used her categories as a starting point and worked from there.
Mind
- Read one book a month (instead of listening to it on Audible.)
- Write two blog posts a week
- Work on puzzles again (starting with the one on my puzzle table!!!)
Body
- Continue walking at least 4 times a week (good for me, great for Jazzy!!)
- Add yoga to my mornings (In addition to my little nighttime routine)
- Be kind to myself when I step on the scale!! (8 more pounds until my goal!)
- Make sure to get 1.5 cups of fruit and 2.5 cups of veggies a day (my recommended intake) I miserably fail at this but want to make this small change!
- Seriously consider going gray (I will explain this in another post)
- Get at least 64 ounces of water a day! (There is a great app that is helping me with this goal — Daily water balance tracker: hydration by Grasshoper LLC)
- 9:30 bedtime and a 5:30-6:00 wake-up time (I am NOT a morning person!!)
Soul
- Make morning devos a priority!
- Get to church at least 1 time each month (for many reasons, we’ve gotten out of the habit of organized church)
- Pick monthly verse — plaster it EVERYWHERE!!
- 1 social-media free day every 2 weeks (baby steps… baby steps!)
- Work on 1,000 gifts list (explanation to follow in a blog)
Kindness
- Intentionally make four meals a month for my Momma and Daddy.
- Smile more to people I see out in public (my very bad habit is to walk with my head down to avoid eye contact)
- Send 2 “thinking of you” notes each month
- Use one of my great skills, baking, to reach out to people (haven’t fully formed this kindness but who doesn’t like baked goods??)
Relationships
- Initiate lunch/dinner two times a month (remember… queen of kingdom of isolation 🙂 )
- Call a friend 1 time a month (see above!! )
- Reach out to kids one time each weeks (we’ve gotten into a “no news is good news” routine
Home
- Declutter basement (only space left to do)
- Re-think kids’ rooms (since both are firmly in their 30’s and won’t be coming home to live!!)
- Help DannyO with home projects (I usually just watch 🙂 )
- Work to complete new dish set (so I can finally rid myself of the heavy, brown Marcrest)
- Set financial goals
- Plan meals for every two weeks and buy meat at that time (Many little trips to the grocery store means money frittered away)
Creative Soul
- Participate in one sewing challenge (My friend Nat is already helping me with this one)
- Pick realistic sewing projects (i.e. stop making clothes I’ll never wear!!)
- Paint one hour each day
- sew one hour each day
- Finish my 100 small paintings project (I’m on #17)
- Try pastels as a medium (sweet son-in-law bought me a great set 🙂 )
There you have it!! My practical list for 2018 — not too lofty, but I want to be always growing, always learning, always moving forward!
Be blessed!
Baked Potato Soup – Chicken Parmesan Tenders
We are an old-fashioned family. We eat a protein, a starch and a vegetable every meal. It often tasks my brain to come up with a different starch. I’ve been making this soup since 2006. It uses baked potatoes, which makes it nice for leftovers. In my opinion, baked potatoes have much more flavor. I cut the recipe in half since it is just DannyO and I and served it with baked Parmesan chicken tenders and a salad. 
Baked Potato Soup
- 4 large baking potatoes (about 2 3/4 pounds)
- 2/3 cup butter
- 2/3 cup flour
- 3/4 teaspoon salt (I use 1 1/4 teaspoons because I felt it needed a bit more)
- 3/4 teaspoon white pepper (you can use black pepper but the white pepper keeps the creamy broth all white)
- 6 cups milk -(or more if the end product is too thick for your liking. We like it thick 🙂 )
- 1 cup (8 ounces) sour cream
- 1/4 cup thinly sliced green onions
- 10 bacon strips, cooked and crumbled
- 1 cup shredded cheddar cheese
- Bake potatoes at 350 for 65-75 minutes or until tender; cool completely. Peel and cube potatoes.
- In large saucepan or dutch oven melt butter; stir in flour, salt and pepper until smooth.
- Gradually add milk. Bring to a gentle boil; cook and stir for 2 minutes or until thickened.
- Remove from heat; whisk in sour cream. Add potatoes and green onions.
- At this point, you may need to put it back on the stove to heat the potatoes through. Make sure you don’t put it on a high heat! Add more milk at this time if you think it is too thick.
- Garnish with bacon and cheddar cheese. Serve.
The chicken tenders are a recipe I made myself although I’m sure there are many on line. I will give you the ingredients I use. The important thing is to bake on a wire rack on a cookie sheet so the tenders are crisp on all sides.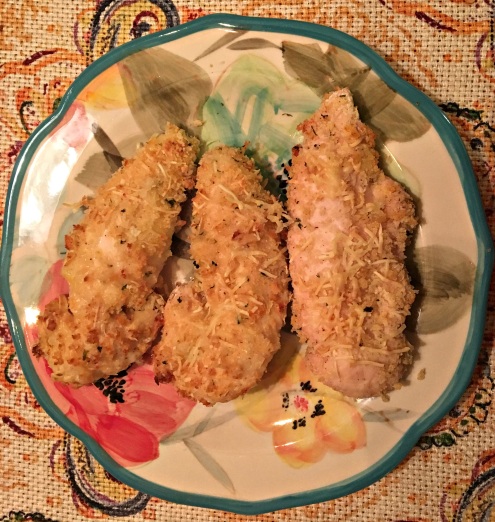
Baked Parmesan Cheese Chicken Tenders
- 8 ounces chicken tenders
- 2 eggs
- 1/2 cup flour
- Salt/pepper
- 1 cup seasoned panko or bread crumbs
- shredded parmesan cheese
- Preheat oven to 400 degrees. Combine flour, salt and pepper in a ziploc bag and put the tenders in. Mash around until they are covered. Shake them off well and put on a plate.
- Beat 2 eggs in one pie plate. Add the seasoned panko and parmesan cheese in another.
- Using the assembly method, put the tenders in the egg mixture and dredge through the panko/parmesan mixture.
- Put on wire rack on cookie sheet. For convenience, I cover the cookie sheet with aluminum foil.
- Bake at 400 degrees for 20-30 minutes.
Go forth and cook an easy supper!!
Minimizing MY Way – Staying on the Journey
 I’ve been on the “minimalism MY way” journey for 21 months and sometimes I still struggle. I war between wanting a French Country style with all of its beauty and layers and a minimalist look with its peace and quiet. {{Sigh}}
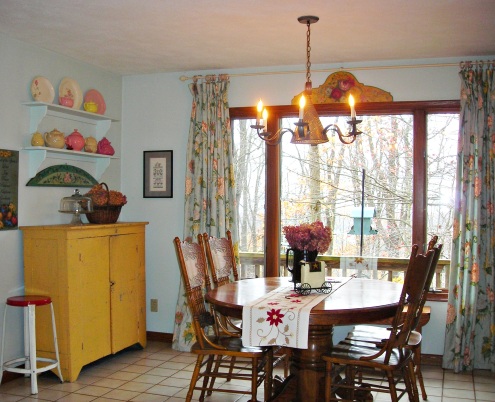
The last few days I’ve been “thinking” about adding to my kitchen/dining room. Thinking about copper pots, ironstone, covered glass domes filled with beautiful things, banners that spell out beautiful words, flowers and more flowers, fabric that adds to the look of “comfort,” candlesticks… you get the idea 🙂
And then I come back to the reason I decided to embark on the minimalism MY way journey; because the clutter in my head matched the clutter in my house. And I decide to spend a rainy afternoon rearranging what I have.
I still may go to a lighter style of dishes. My Marcrest is so heavy looking and bulky. I have a few pieces of “Stubenville Pottery, Fairlane Pattern,” and may choose to replace what I have with those pieces. I may fill a bowl of spiced orange pomander balls for the Christmas season. I am painting another breadbox to display on my primitive cupboard.
See?? My journey includes compromise!! I promise you, if you go on the journey, you will have to compromise too. And that’s okay!! Here is my kitchen/dining room sparkling clean and beautiful!!


I am content.
Creamy Chicken and Mushroom Soup
It is a rainy Monday morning here on Blueberry Hill and I wanted to write a quick blog post about the second soup I made this last week. I usually never make two soups in a week but I had mushrooms and homemade chicken broth that needed used. I found this recipe on the Damn Delicious Blog but since I’ve made my own changes to it, I am declaring it mine too 🙂
DannyO says to keep it in my recipe file so if he says that, I say it’s good enough to share!! default
Creamy Chicken and Mushroom Soup
- 1 tablespoon olive oil
- 8 ounces chicken tenders cut into small chunks
- kosher salt and freshly ground pepper
- 2 tablespoons unsalted butter
- 3 cloves garlic, minced
- 16 ounce baby bella mushrooms sliced thinly
- 1/2 sweet onion, diced
- 3 carrots peeled and diced
- 2 stalks celery, diced
- 1/4 teaspoon dried thyme
- 1/4 cup flour
- 4 cups chicken stock
- 1 bay leaf
- 1/2 cup half and half or more (See Note**)
- 1/4 cup chopped fresh parsley leaves
- Heat olive oil in soup pot or dutch oven over medium heat. Season chicken well with salt and pepper. Add to pot and cook until browned, stirring frequently, about 5 minutes, making sure chicken is cooked completely.
- Melt butter in the pot over medium/low heat. Add garlic, mushrooms, onion, carrots and celery. Cook, stirring occasionally, until tender, about 3-4 minutes. (See Note*) Stir in thyme and cook about 1 more minute.
- Whisk in flour, stirring constantly, for about 1 minute. Whisk in chicken stock, bay leaf and chicken tenders and cook, whisking constantly, until slightly thickened, about 4-5 minutes.
- Stir in half and half until heated through, about 1-2 minutes. (See Note**) Season with salt and pepper to taste. If the soup is too thick, add more half and half or broth until desired consistency is reached.
- Garnish with parsley and serve with a crusty bread.
Note* The dice on the vegetables needs to be small enough to cook through in 3-4 minutes. I slit the celery down the middle before slicing and I slit the carrots into 4 long pieces before dicing into little squares. That is the beauty of this recipe!! It can be cooked literally in 30 minutes or less!!
Note** If you want to make it a dairy-free recipe, I would add 1/2 cup of extra chicken broth and then check the consistency. If needed, add more chicken broth. If you want to be brave and try it without the flour and half and half, go for it!! You will have more of a regular soup consistency with the mushrooms acting as the noodles!!
Go forth and make soup!!
